Important Recommendations
Roca Brasil Cerámica, aiming at the best orientation of its customers, provides the main guidelines to be followed in the process of receiving the product, storage, laying, making cuts, in addition to care with maintenance, post-construction cleaning and cleaning.
It is very important to observe and follow these guidelines, because in this way, at each stage, actions recommended by the manufacturer and required by standard will be carried out safely, either in the transport and handling phases, avoiding damages in transport and storage, ensuring the integrity of the products until their destination, as well as in the laying and cutting phases, providing cuts with perfect finishes and pieces set free from details and imperfections that denigrate the beauty of the product and environment, as well as execution failures that compromise the product’s durability, generating pathologies and annoyances such as breakages , cracks, displacements, among others.
– It is common for doubts to arise about the correct way of moving, transporting and storing ceramic products, as well as situations of damage (scratches, chips, breaks, stains, etc.) resulting from failures in one or more of these steps, which “damage and compromise ceramic products” before laying.
2. Objective:
– Seeking to help our customers, employees, transporters and interested parties, the Incepa Roca group brings in this material General Recommendations (for all stages) and Specific Recommendations (for each one of them), “thus enhancing the necessary care” to ensure the integrity of ceramic products “until its use”.
3. General Recommendations: (For all steps)
– Hire specialized labor (with experience in ceramic products);
– Avoid impacts of any kind;
– To avoid corners, chips and breakage, never deposit “ceramic product boxes” directly on concrete floors or other hard surfaces; “even if temporarily”;
– “Preferably” do not move, transport or store ceramic products in the rain or drizzle, avoiding dampening, packaging degradation and future pathologies (stains, back marks, among others.);
4. Specific Recommendations: “For each of the Steps”
4.1. Recommendations for the Handling Phase (Manual and Forklift Handling);
Manual movement:
– Preferably load one box at a time, “always respecting” the inherent physical capacity of each worker, thus avoiding accidents and/or damage to products handled due to excess load.
– In bale situations (blocks of 2 or 3 strapped boxes for better transport stability), move these bales in 2 loaders (depending on weight). Or, at the final destination (after transport), dismantle these bales for individual loading per box (taking care not to damage the boxes);
Handling with Forklifts:
– Never move pallets if they are not tightened (plasticized) and with the boxes properly strapped (tied);
– Do not perform sudden movements, avoiding displacement of boxes and damages;
-Do not travel with forklifts on uneven terrain, avoiding impacts and breakages;
4.2 Recommendations for the Transport Phase:
– Carry out the loading “always respecting” the maximum limit for stacking and disposing of pallets and boxes for this step (According to the attached Stacking Table);
– Never carry out the displacement without the cargo being properly tied and/or strapped, as there will be movement in the pallets and boxes on the truck, damaging the transported products;
– It is expressly prohibited to “accommodate other types of materials on ceramic products” (cement, grains, machinery, etc.)
4.3 Recommendations for the Storage Phase:
– The place for storage of ceramic products must be of controlled access, covered, ventilated, free from moisture, with a regular floor “without craters, cracks, etc.” and above all, resistant to the load it will receive;
– For safe stacking of pallets, the Incepa Roca group recommends never exceeding 4.20 m in height, and proceed with stacking at this stage (according to the attached Stacking Table);
– Also for safety, in compliance with NR-11, item 11.3.4 of the Ministry of Labor, always leave the pallet piles with a minimum distance of 50 cm from structural elements of buildings such as pillars, beams and walls;
– For stacking of loose boxes “always respect” the stacking position of the boxes and the maximum stacking allowed by format, “thus avoiding damage to the products” during the storage phase;
– To avoid mixing of products, shades and sizes, always store different products on separate pallets, leaving the box references outside the pallet, facilitating identification and checking.
– For products with the same “Name” description, but with different colors and sizes, “double attention”, always leaving them far from each other in the warehouse and properly identified. Note: If possible, “restrict access to one of the lots” until you are sure that the other is fully used.
5 Pallet and Box Stacking Table by Format:
| CLASS | FORMAT | Maximum Stacking of Pallet’s (Static) | Maximum Stacking of Pallet’s (for Transport) | Maximum Stacking of Pallet’s (for Transport) | Stacking Position Loose Boxes (Static ) | Maximum Stacking of Loose Boxes (Transportation ) | Loose Boxes Position (for transport ) | Or | Maximum Stacking of Loose Boxes (Transportation ) | Loose Boxes Position (for transport ) |
| Wall (Cxs. H) | 3×6 (Pçs V) | 4 | 2 | 6 | Horizontal Boxes | do not stack | Horizontal Boxes | X | X | |
| Wall (Cxs. H) | 11 X 11 (Pçs V) | 4 | 2 | 6 | Horizontal Boxes | do not stack | Horizontal Boxes | X | X | |
| Wall (Cxs. H) | 11 X 25 (Pçs V) | 3 | 2 | 5 | Horizontal Boxes | do not stack | Horizontal Boxes | X | X | |
| Wall (Cxs. H) | 15×15 (Pçs V) | 3 | 2 | 6 | Horizontal Boxes | do not stack | Horizontal Boxes | X | X | |
| Wall (Cxs. H) | 15 X 20 (Pçs V) | 3 | 2 | 6 | Horizontal Boxes | do not stack | Horizontal Boxes | X | X | |
| Wall 7mm | 24 X 33 | 4 | 2 | 4 | Vertical Boxes | do not stack | Vertical Boxes | X | X | |
| Wall | 24 X 59 | 4 | 2 | 4 | Vertical Boxes | do not stack | Vertical Boxes | X | X | |
| Wall | 27 X 43 | 4 | 2 | 4 | Vertical Boxes | do not stack | Vertical Boxes | X | X | |
| Wall 7mm | 29.6 X 40 | 4 | 2 | 3 | Vertical Boxes | do not stack | Vertical Boxes | X | X | |
| Wall | 30 X 70 | 4 | 2 | 3 | Vertical Boxes | do not stack | Vertical Boxes | X | X | |
| Wall | 30 X 90 | 4 | 2 | 3 | Vertical Boxes | do not stack | Vertical Boxes | X | X | |
| Wall 6mm | 32 X 59 | 4 | 2 | 3 | Vertical Boxes | do not stack | Vertical Boxes | X | X | |
| Wall 8,2mm | 32 X 59 | 4 | 2 | 3 | Vertical Boxes | do not stack | Vertical Boxes | X | X | |
| Wall | 32 X 59 | 4 | 2 | 3 | Vertical Boxes | do not stack | Vertical Boxes | X | X | |
| Wall 8mm | 33 X 60 | 4 | 2 | 3 | Vertical Boxes | do not stack | Vertical Boxes | X | X | |
| Wall 6mm | 33 X 60 | 4 | 2 | 3 | Vertical Boxes | do not stack | Vertical Boxes | X | X |
| CLASS | FORMAT | Maximum Stacking of Pallet’s (Static) | Maximum Stacking of Pallet’s (for Transport) | Maximum Stacking of Pallet’s (for Transport) | Stacking Position Loose Boxes (Static ) | Maximum Stacking of Loose Boxes (Transportation ) | Loose Boxes Position (for transport ) | Or | Maximum Stacking of Loose Boxes (Transportation ) | Loose Boxes Position (for transport ) |
| Wall | 33 X 60 | 4 | 2 | 3 | Vertical Boxes | do not stack | Vertical Boxes | X | X | |
| Floor | 14.5 X 14.5 | 3 | 2 | 5 | Horizontal Boxes | 3 boxes | Horizontal Boxes | X | X | |
| Porcelain | 15.4 X 61 | 4 | 2 | 5 | Vertical Boxes | do not stack | Vertical Boxes | X | X | |
| Porcelain | 19,3 X 60 | 4 | 2 | 5 | Vertical Boxes | do not stack | Vertical Boxes | X | X | |
| Porcelain | 19.3 X 120 | 4 | 2 | 5 | Vertical Boxes | do not stack | Vertical Boxes | X | X | |
| Porcelain | 24.5 X 100 | 4 | 2 | 5 | Vertical Boxes | do not stack | Vertical Boxes | X | X | |
| Porcelain | 29.5X120 | 4 | 2 | 3 | Vertical Boxes | do not stack | Vertical Boxes | X | X | |
| Porcelain | 30 X 60 | 4 | 2 | 3 | Vertical Boxes | do not stack | Vertical Boxes | X | X | |
| Porcelain | 30.5 X 61 | 4 | 2 | 3 | Vertical Boxes | do not stack | Vertical Boxes | X | X | |
| Mosaic | 30.6 X 30.6 | 2 | 1 | 5 | Horizontal Boxes | 3 boxes | Horizontal Boxes | X | X | |
| Porcelain | 31 X 61 | 4 | 2 | 3 | Vertical Boxes | do not stack | Vertical Boxes | Or | 4 boxes | Horizontal Boxes |
| Porcelain | 33 X 33 | 5 | 2 | 3 | Vertical Boxes | do not stack | Vertical Boxes | Or | 5 boxes | Horizontal Boxes |
| Porcelain | 39.5 X 80 | 4 | 2 | 3 | Vertical Boxes | do not stack | Vertical Boxes | Or | X | X |
| Floor 7mm | 40 X 40 | 4 | 2 | 3 | Vertical Boxes | do not stack | Vertical Boxes | Or | 3 boxes | Horizontal Boxes |
| Floor | 43 X 43 | 4 | 2 | 3 | Vertical Boxes | do not stack | Vertical Boxes | Or | 5 boxes | Horizontal Boxes |
| Porcelain | 43.5 X 43.5 | 4 | 2 | 3 | Vertical Boxes | do not stack | Vertical Boxes | Or | 5 boxes | Horizontal Boxes |
| Floor 7mm | 44.5 X 44.5 | 5 | 2 | 3 | Vertical Boxes | do not stack | Vertical Boxes | Or | 3 boxes | Horizontal Boxes |
| Porcelain 8 mm | 44.5 X 44.5 | 5 | 2 | 3 | Vertical Boxes | do not stack | Vertical Boxes | Or | 4 boxes | Horizontal Boxes |
| Porcelain | 44.5 X 44.5 | 5 | 2 | 3 | Vertical Boxes | do not stack | Vertical Boxes | Or | 6 boxes | Horizontal Boxes |
| Porcelain | 44.5 X 90 | 4 | 2 | 3 | Vertical Boxes | do not stack | Vertical Boxes | Or | X | X |
| Porcelain | 54.4 X 54.4 | 5 | 2 | 2 | Vertical Boxes | do not stack | Vertical Boxes | Or | 6 boxes | Horizontal Boxes |
| Porcelain 8mm | 60 X 60 | 5 | 2 | 10 | Horizontal Boxes | do not stack | Vertical Boxes | Or | 6 boxes | Horizontal Boxes |
| CLASS | FORMAT | Maximum Stacking of Pallet’s (Static) | Maximum Stacking of Pallet’s (for Transport) | Maximum Stacking of Pallet’s (for Transport) | Stacking Position Loose Boxes (Static ) | Maximum Stacking of Loose Boxes (Transportation ) | Loose Boxes Position (for transport ) | Or | Maximum Stacking of Loose Boxes (Transportation ) | Loose Boxes Position (for transport ) |
| Porcelain 8,5mm | 60 X 60 | 5 | 2 | 15 | Horizontal Boxes | do not stack | Vertical Boxes | Or | 6 boxes | Horizontal Boxes |
| Porcelain | 60 X 60 | 5 | 2 | 15 | Horizontal Boxes | do not stack | Vertical Boxes | Or | 6 boxes | Horizontal Boxes |
| Porcelain | 60 X 120 (Pçs V) | 2 | 1 | 10 | Horizontal Boxes | do not stack | Vertical Boxes | Or | 5 boxes | Horizontal Boxes |
| Porcelain | 61 X 61 | 5 | 2 | 15 | Horizontal Boxes | do not stack | Vertical Boxes | Or | 6 boxes | Horizontal Boxes |
| Porcelain | 80 X 80 | 4 | 2 | 15 | Horizontal Boxes | do not stack | Vertical Boxes | Or | 6 boxes | Horizontal Boxes |
| Porcelain Lam. (crate) | 80 X 120 (Pçs H) | 2 | 1 | 1 | “crate” na Vertical | do not stack | “crate” na Vertical | Or | X | X |
| Porcelain | 90 X 90 | 3 | 2 | 15 | Horizontal Boxes | do not stack | Vertical Boxes | Or | 5 boxes | Horizontal Boxes |
| Porcelain (crate) | 90 X 180 (Pçs V) | 1 | 1 | 1 | “crate” na Vertical | do not stack | “crate” na Vertical | Or | X | X |
| Porcelain | 100 X 100 | 2 | 1 | 15 | Horizontal Boxes | do not stack | Vertical Boxes | Or | 5 boxes | Horizontal Boxes |
| Porcelain (crate) | 100 X 300 (Pçs H) | 2 | 1 | 1 | “crate” na Vertical | do not stack | “crate” na Horizon. | Or | X | X |
| Porcelain | 120 X 120 | 2 | 1 | 15 | Horizontal Boxes | do not stack | Vertical Boxes | Or | 5 boxes | Horizontal Boxes |
| Porcelain | 150 X 75 (Pçs H) | 1 | 1 | 10 | Horizontal Boxes | do not stack | Vertical Boxes | Or | 5 boxes | Horizontal Boxes |
| Porcelain (crate) | 150 X 300 (Pçs H) | 5 | 1 | 1 | “crate” na Vertical | do not stack | “crate” na Horizon. | X | X |
– Qualified labor: before hiring a professional tile maker, make sure that he/she has good experience in laying ceramic products. If possible, look for indications, references, request photos and evaluate previous work of the professional to be hired, thus seeking to certify whether the quality of the labor offered meets the expectations for the work you want to carry out.
Important: Roca Brasil Cerámica is not responsible for damages caused to the product(s) resulting from incorrect handling or labor failures occurred in the application process.
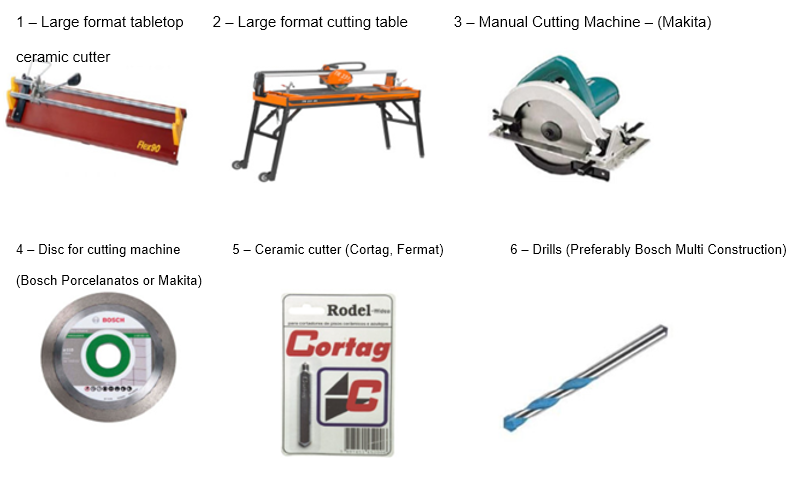
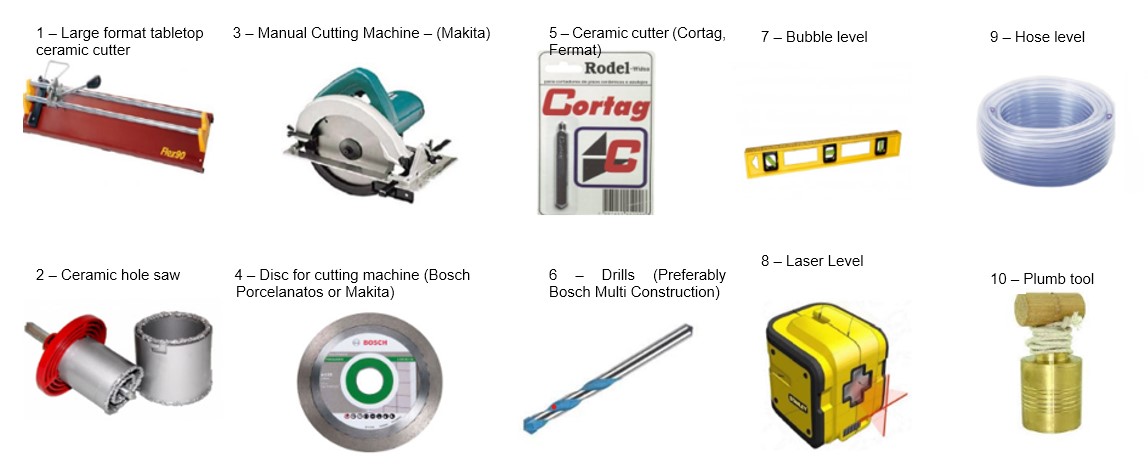
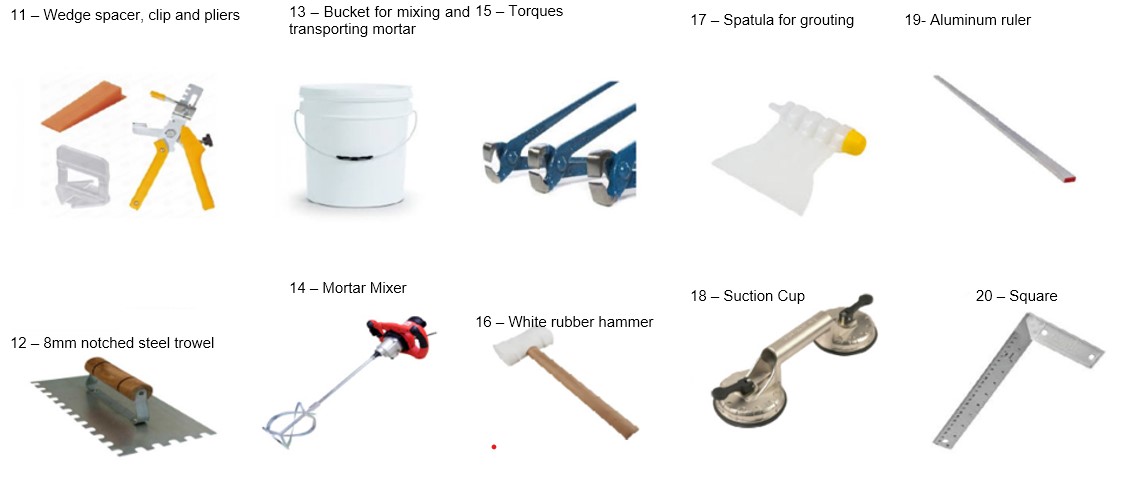
– Appropriate Tools: Attention! The lack of specific tools or accessories, worn or in poor condition, are strong indicators of possible problems in the laying phase, especially in large formats, whether due to the excess of breaks generated in the attempt to make cuts, (worn discs and vines or of poor quality), cuts with imperfect finishes (crooked, with serrated aspect, etc.), irregular settlement with misaligned and/or out of level parts (lack of proper spacers and levelers), among other problems generated by not using machines, appropriate tools and accessories that enhance the laying quality.
– Recommended Machines, Tools and Accessories:
– Adhesive mortar:
Check which mortar to use for the type of product to be applied and strictly follow the manufacturer’s instructions regarding the method of preparation. Below indicative table of mortar for each typology of Roca Cerámica and Incepa products:
| Product typology | Recommended mortar type |
|---|---|
| – Ceramic coatings for indoor use | ACI type mortar |
| – Pure stoneware floor | ACII type mortar |
| – Technical and enameled porcelain tiles | ACIII type mortar, Floor on floor, Specific for porcelain |
Comments:
– In addition to the mortars indicated above, there are specific mortars for large formats, it is important to evaluate the performance and cost-benefit ratio for each option, thus seeking to identify the best choice.
– For application in front of barbecue grills, fireplaces, on other ceramics, or in specific situations, consult the mortar manufacturer.
– For application of floors and porcelain tiles on facades and walls with adhesive mortar, the maximum height allowed is 3 meters. Higher than this height, Incepa recommends application with the ventilated façade technique.
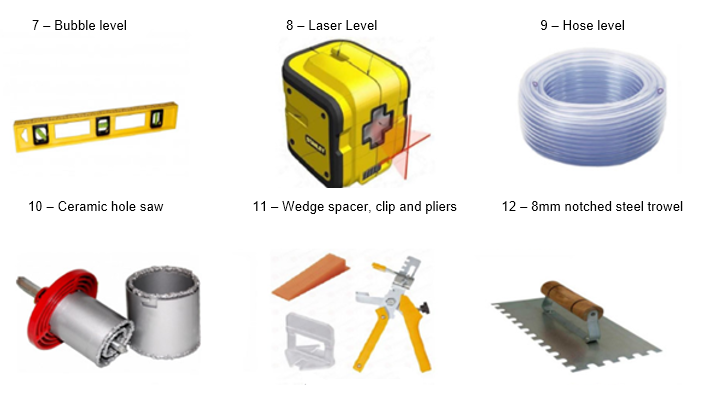
– According to NBR-ABNT 13753:1996, parts with an area equal to or greater than 900cm2 must be applied with the aid of a serrated trowel (8mm teeth) and double gluing of mortar (mortar on the back of the part and on the subfloor to be laid).
– Inspecting and Knowing the Product: Before starting the application, make sure that the product to be installed is recommended for the intended location (PEI or degree of use, friction coefficient, etc.), if the quantity purchased easily attends the area to be coated (counting % for losses and cuts, more parts for future maintenance) and if the product boxes are of the same reference, shade, caliber, etc. It is also essential to read the guidelines printed on the packaging by the manufacturer, they report regulatory requirements and specific characteristics of the product to be applied that directly influence the correct form of its settlement, such as minimum joint, shade variation class, maximum lashing allowed, arrow direction, etc.
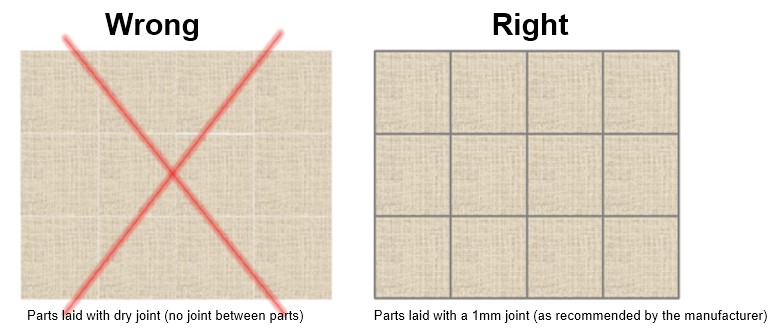
– Example 1 – Always follow the minimum joint recommended by the manufacturer (For ground products and flat edge, the minimum recommended joint is 1mm).
– Example 2: Types of application and maximum percentages allowed (with and without the use of Leveling spacers)
Application types:
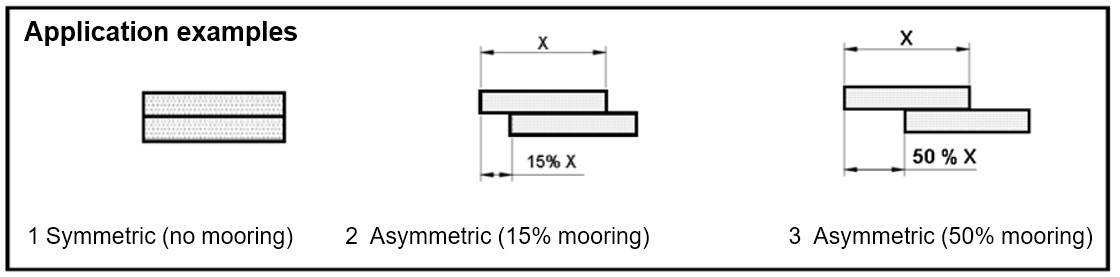
Maximum permissible mooring percentages according to application:
– Mismatched Application without the use of leveling spacers (Wedge) the maximum allowed lashing is up to 15%;
– Mismatched application with the use of leveling spacers (Wedge) the maximum lashing is up to 50%;
Heads up:
– Incepa is not responsible for laying errors resulting from failure to follow the guidelines recommended by the manufacturer and/or required by standard.
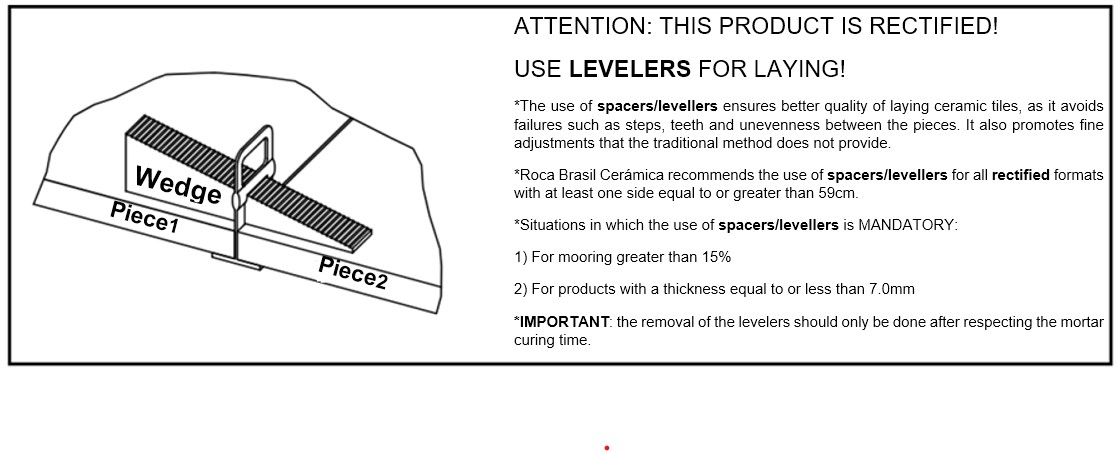
– The wedge leveler spacer is mandatory for mismatched applications whose lashing is greater than 15%, if not used, the product will inevitably present unevenness from the retraction of the mortar and curvature of the pieces
– Subfloor Check: It must be performed in accordance with the ABNT-NBR13753:1996 standard “Internal or external floor covering with ceramic plates and using adhesive mortar”, below are some of the main recommendations:
– It must be carried out at least 14 days in advance of the laying of the ceramic coating, seeking to reduce the effect of the mortar retraction on the ceramic floor to be executed.
– The surface finish of the subfloor must be rough, obtained by slatting or light straightening, thus contributing to a better adhesion of the mortar.
– Trims:
– Indoor non-wettable environments, such as bedrooms and living rooms (level or with a maximum fall of 0.5%);
– Indoor wettable environments, such as kitchens, laundries (recommended trim of 0.5% and maximum of 1.5%);
– Bwc box trim between 1.5% to 2.5%;
– Recommended outdoor environment with a minimum trim of 1%;
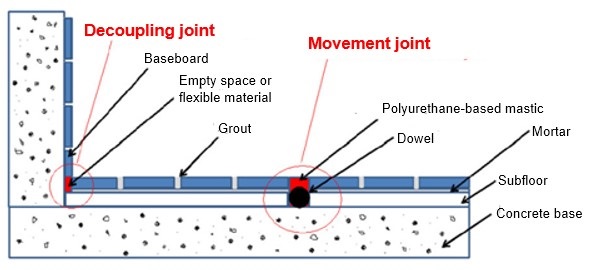
– Movement and Decoupling Joints:
– The Movement Joint must be performed indoors when the floor area is equal to or greater than 32m2, or when one of the sides is greater than 8m.
– The Movement Joint must be performed outdoors when the floor area is equal to or greater than 20m2 or when one of the sides is greater than 4m.
– On the perimeter of the coated area and at the meeting with columns, beams and projections, the Decoupling Joint must be executed.
c. Step by Step for Laying Large Format Floors:
– Start Settlement Only After Completion of the Steps Below:
– Wall coverings;
– Ceiling coatings;
– Fixing the Frames;
– Execution of waterproofing;
– Installation of piping and conduits embedded in the subfloor;
– Testing of piping and conduits embedded in the subfloor for watertightness and clearance;
– Base and Subfloor Verification;
– Start laying, respecting the minimum curing time for the concrete base, which is 28 days and for the subfloor, which is 14 days. Note: (For normal curing process, if setting/curing accelerator additives are used, this period can be reduced);
– Make sure that the base and/or subfloor complies with NBR13753:1996 (level, trim, surface, etc.). If irregularities are identified, it will be necessary to perform a regularization layer according to the technical standards for adequacy.
– Check the waterproofing, if the surface of the base or subfloor is always damp, wet or showing signs of efflorescence, it will be necessary to redo the waterproofing. (Do not start the settlement);
– Confirm that the structural or movement joints were carried out in accordance with the project and current standards, remembering that these joints when laying the floor or ceramic covering must be respected;
– Finally, with the aid of a spatula, remove lumps of cement, mortar, plaster remains, glue, among other materials adhered to the subfloor that may affect the leveling of the pieces and then sweep, eliminating any type of residue and loose particles that can form a film and compromise the adhesion of the mortar.
– Mortar;
– Recommended mortar: According to preliminary tips, the type ACII mortar is recommended for the application of Pure Gres Floors, and the ACIII mortar is recommended for the application of Porcelain tiles. There are also specific mortars for the application of large formats (consult the manufacturer, assess cost x benefit);
– Consumption: Average consumption of 7.5kg/m2 (8 mm trowel and double layer according to NBR13753:1996).
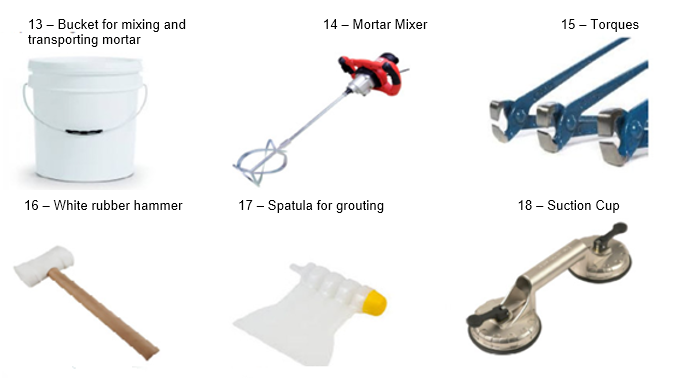
– Preparation: Place the measure of water indicated on the packaging by the manufacturer in a bucket and under agitation of the mixer, add the powdered compound to the mortar until its end, keep stirring until obtaining a homogeneous mixture, without lumps, pasty and adhering. For the additives to start their action, it is necessary to leave the mixture resting for a period indicated by the manufacturer (check the packaging, on average 15 minutes), after this period, shake again and that’s it, the mortar is ready for use. Note: Never add more water than recommended by the manufacturer.
– Usage time: After preparation, use the mortar within 2 hours and 30 minutes, with the addition of water and other products being prohibited.
– According to the NBR-ABNT 13753:1996 standard, pieces with an area equal to or greater than 900cm2 must be applied by double gluing mortar (mortar on the back of the piece and on the subfloor to be laid).
Planning:
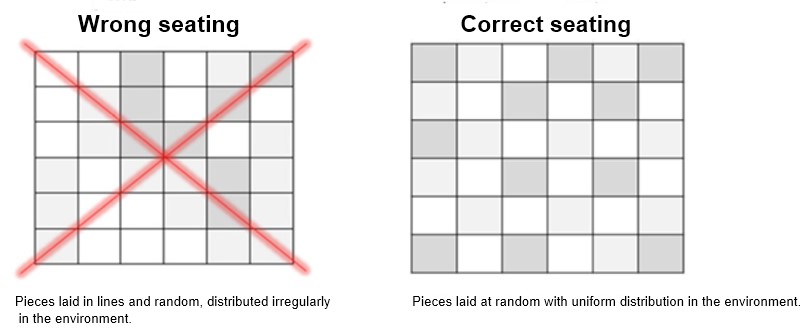
– Layout of the pieces: Before starting the collage, it is recommended to review the layout, making sure that the layout of the pieces chosen is the one that best values the product and the environment, simulating and preventing unforeseen events, avoiding excessive cutouts, respecting the joints. movement and desolidarization, meet the desired aesthetic effect, etc.
Note: For products that imitate stones, wood, cement, among others and that purposely present a variation in tone and/or texture (tone variation classes V2, V3 or V4), it is also recommended to open some boxes and assemble a panel with the pieces loose on the subfloor, arranging the variations present in a homogeneous and random way until the desired effect is obtained, later on, perform the laying and repeat the process until the finalization of the environment.
– Example – Shade Variation Product (Class V3)

– Execution:
– Identifying the Application Targeting Arrow:
– Remove the piece from the packaging and identify the orienting arrow on the back of the piece (back). This arrow serves to direct the laying, that is, all the pieces must be placed pointing in a single direction.
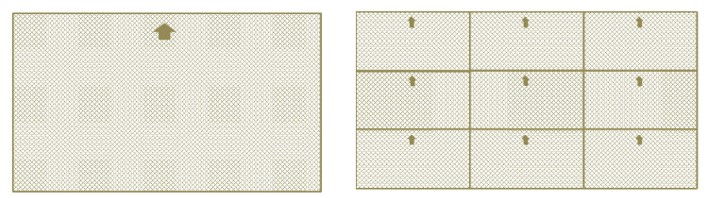
Note: The problem is that with the application of mortar on the back, the arrow is covered, thus generating margins for application failures. To prevent this from happening, Incepa recommends using a pencil to scratch the side of the piece that contains the arrow (thickness). In this way, even after applying the mortar and covering the arrow, it is possible to identify the correct side for application through the lateral marking.
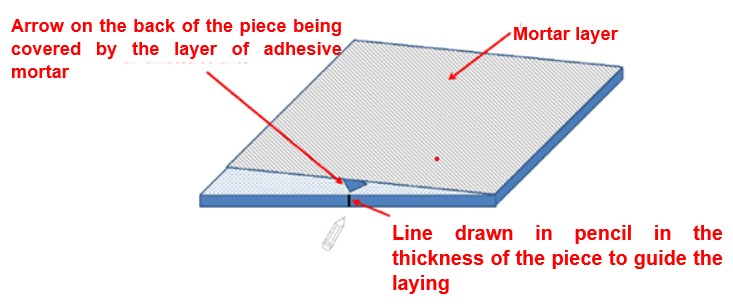
– Applying the mortar on the back of the piece and subfloor (Double Layer):
– Once the side of the part is identified, with the aid of the steel trowel, use the smooth side to apply and spread a homogeneous layer of mortar on the entire back of the part (form a 30º angle between the metal plate of the trowel and the back of the part to facilitate the application) and also on the subfloor not exceeding the maximum area of 1.50 m2. (applying in larger areas can dry the mortar and form a film, thus harming the adhesion of the piece).
– Then, with the serrated side of the trowel (at a 60º angle in relation to the base to facilitate the operation), form grooves (cords) in the mortar applied on the back of the piece and on the subfloor.
Note:
– To prevent excess mortar from migrating to the surface of the piece, during placement and densification, with the aid of a trowel (at a 45º angle in relation to the base to facilitate the operation) remove excess mortar applied to the sides of the piece, forming a kind of chamfer. – According to NBR 13753-1996, it is mandatory to use a double layer of mortar (mortar on the back of the piece and subfloor) for laying formats larger than 900cm2 (30x30cm). Failure to comply automatically invalidates the warranty.
– Laying the Pieces:
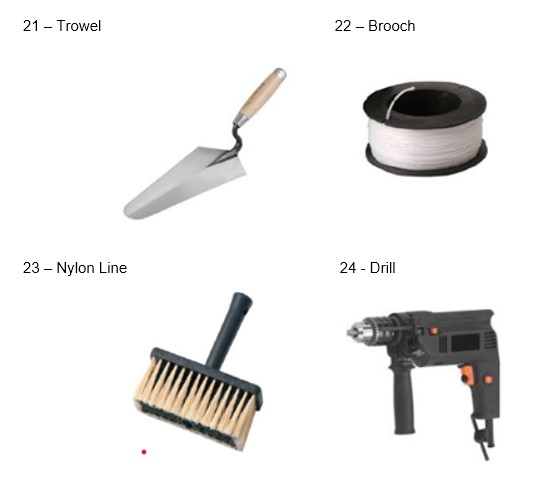
– Place the piece slightly out of the position to be laid (preferably with the aid of suction cups) and then press it, making small vibrations, dragging the piece perpendicularly to the cords and directing it close to the final position. With a white rubber hammer (to avoid dirtying and marking the part) hits the part with medium force to take place air draw, total crushing of the cords, reaching the level, square, plumb and final position.
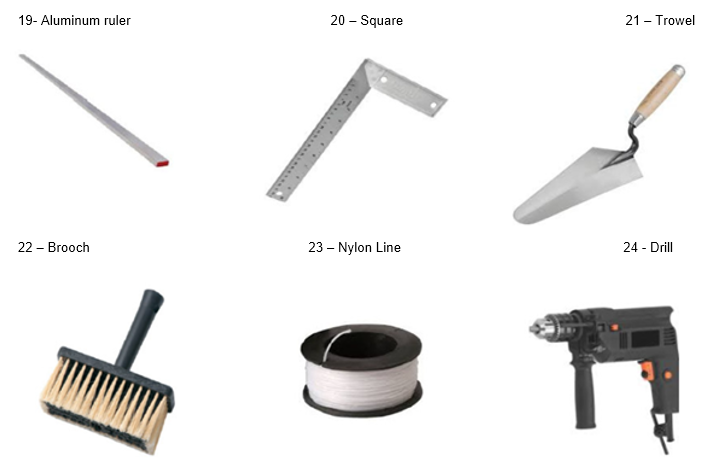
Note: This will be the master piece “that will start and continue the perfect settlement”, being of fundamental importance that it be applied in the correct position, within the level, plumb, square, etc. For this, use all available resources (line, bubble level, hose level, leisure level, aluminum ruler, etc.) to ensure the accuracy of this part and, consequently, of the others that will be installed from it.
– Then place the leveling spacer clips on the sides and/or center of this part (respecting the minimum joint recommended by the manufacturer), fitting the clip base into the base of the seated part, thus being positioned to receive the subsequent part.
– Then repeat the procedure on the subsequent piece (side marking), apply mortar, form the beads, remove excess mortar on the side of the piece, place it slightly out of position, carry out the movement and hit it with a hammer until this piece comes close its final position, which is to be aligned with the first master piece and leaning against the spacers that will delimit the recommended spacing.
– With the piece practically in the final position, place the spacer wedge inside the clips and with the help of pliers, press the wedge until ensuring the leveling between the pieces and the final position (eliminating teeth, placing the pieces in the same plane and tying the plane homogeneously).
Note:
– If even pressing the wedge the piece does not reach the same level as the master piece (final position), it will be necessary to check the amount of mortar applied to this piece (it may be missing or in excess). In this case, the part must be removed to adjust the amount of mortar (placement or removal) and subsequent replacement, thus achieving perfect alignment with the master part and final position, providing a basis for the application of the subsequent part;
– To guarantee and enhance the desired effect when laying large formats, the application with a wedge leveling spacer becomes indispensable. For more information, consult the Incepa Technical Assistance Department.
– Repeat the procedures described above in the subsequent parts until the environment to be applied is closed.
Important: Do not forget to carry out the movement and desolidarization joints as recommended by ABNT 13754:1996 and informed in the Important Preliminary Tips.
Cuts: – They are necessary for performing pagination, closing environments, for contouring structural elements such as pillars and beams, embedding lighting elements, drains, pipes, creating movement and expansion joints, among others.
– A perfect cut is only possible with the combination of adequate tools, of quality and in good condition, operated by qualified labor.
Note. For large formats, there are specific tools that ensure accurate cuts and safe handling, both in the cutting phase and for the steps of moving and laying, as they are fundamental to guaranteeing the execution with quality of cuts and laying of pieces with large dimensions.
– Straight cuts
– With the zapata cutter (table scriber), as below:.
– Scratch the piece with a pencil where you want to cut;
– Position the piece by adjusting the demarcated line under the video line,
-the diamond vine over the marking using medium force (if you force too much it will give the appearance of serrations, compromising the quality of the cut), be careful not to move the piece;
– Once the risk is done, position the part with the risk centered on the cutter detachment, using the lever to use force until detachment and separation of the parts;
– If necessary, with an iron sandpaper supported on a piece of wood, lightly sand the scratched surface, giving the final touch to the finish. (If the finishing is ok with the previous step, eliminate this step);
Straight cut with water cooled cutting table
– With a pencil, trace the piece where you want to cut;
– Place the piece on the cutting table matching the marking on the cutting line of the disc to be performed;
– Turn on the machine and the water cooling system and pass the disc on the marking, thus making the cut.
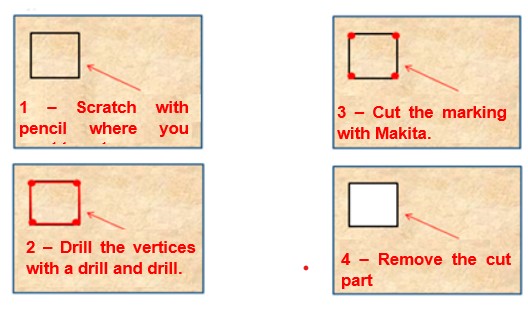
– Insertion cuts, for insertion of passage boxes, outlines of columns or beams, etc., must be carried out with the manual cutting machine (makita), the main tips are below:
– Scratch the piece where you want to cut;
– Drill with a drill at the vertices of the cuts, seeking to alleviate tensions;
– Carry out the cut with the manual cutting machine;
– Highlight the part that will not be used;
– Sanding with iron sandpaper supported on a piece of wood for a better finish;
– Circular cuts for insertion of pipes, lights, etc., must be carried out with the aid of a ceramic cup saw, the main tips are:
– Mark on the part the size of the diameter of the pipe, light, drain or other element that you want to embed;
– With the aid of a drill + hole saw for ceramics in the correct diameter, make the desired cut;
Rejoining:
– Use resin, acrylic or epoxy grout, in the preferred color;
– Prepare as indicated and recommended by the grout manufacturer;
– Rejoin at least 3 days after laying;
– Clean the joints, leaving them free from any type of dirt that could impair the penetration and adhesion of the grout;
– Moisten the joints with the aid of a brush to ensure good hydration and adhesion of the grout (do not soak);
– With the joints still damp, apply the grout in excess with the aid of a spatula or rubber trowel, completely filling the joints. Note: To facilitate the application, perform diagonal movements in relation to the joints.
Note: Carry out the procedure with medium strength and caution, seeking not to damage the product.
– Leave to dry for 15 minutes, then remove excess grout and clean the floor with the aid of a damp sponge.
Note: If you leave it to dry for a longer time, it can make it difficult to remove and clean the floor, especially in satin and slip-resistant products (Grip, Grip-Plus and Abs).
– To finish, dry with a damp cloth.
– This material brings the main recommendations of the manufacturer and/or described in the standard for the correct execution of the laying of Ceramic Coatings on the wall, seeking:
– Decrease material losses (ceramics, mortar, etc.);
– Improve quality and efficiency of the workforce;
– Enhance the desired aesthetic effect (improving alignment, arrangement of pieces, less cutting, etc.);
– Ensure technical performance required by standard (adherence, useful life, etc.);
– Avoid future problems (slipping, damp stains, cracks, etc.);
2. Important Preliminary Tips:
– Qualified labor: Before hiring a professional tile maker, make sure that he/she has good experience in laying ceramic tiles. If possible, look for indications, references, request photos and evaluate previous work of the professional to be hired, thus seeking to certify whether the quality of the labor offered meets the expectations for the work you want to carry out.
Important: Incepa is not responsible for damage caused to the product(s) resulting from incorrect handling or labor failures, which occurred in the application process.
– Appropriate Tools: Attention! The lack of specific tools or accessories, worn or in poor condition, are strong indicators of possible problems in the laying phase, such as excessive breaks generated when trying to make cuts, (worn or poor quality discs and vines), cuts with imperfect finishes (crooked, serrated, etc.), irregular settlement with misaligned and/or out of level parts (lack of proper spacers and levelers), among other problems generated by the non-use of appropriate machines, tools and accessories that enhance the quality of settlement.
– Recommended Machines, Tools and Accessories:
– Adhesive mortar:
– For wall coverings, Roca Cerâmica recommends ACI type mortar. If you want to apply another type of ceramic product on the wall (floor or porcelain), it is essential to use the mortar recommended by the manufacturer and strictly follow the instructions regarding preparation and use. Below indicative table of mortar for each type of product Roca Cerâmica:
| Product typology | Recommended mortar type |
|---|---|
| – Ceramic coatings for indoor use | ACI type mortar |
| – Pure stoneware floor | ACII type mortar |
| – Technical and enameled porcelain tiles | ACIII type mortar, Floor on floor, Specific for porcelain |
Comments:
– For application in front of barbecue grills, fireplaces, on other ceramics, or in specific situations, consult the mortar manufacturer.
– According to the NBR-ABNT standard, 13754 pieces with an area equal to or greater than 900cm2 must be applied with double gluing of mortar (mortar on the back of the piece and on the base to be laid), more details will be seen ahead in step by step for laying ceramic coverings.
– Inspecting and Knowing the Product: Before starting the application, make sure that the product to be laid is recommended for the intended location, if the quantity purchased easily meets the area to be coated (counting % for losses and cutouts, more parts for future maintenance) and if the product boxes are of the same reference, shade, caliber, etc. It is also essential to read the guidelines printed on the packaging by the manufacturer, these report regulatory requirements and specific characteristics of the product to be applied that directly influence the correct form of its settlement, such as minimum joint, maximum lashing allowed, arrow direction, etc.
– Example: For rectified products and flat edge, the minimum joint recommended by Incepa is 1mm between the pieces.
– Example 2: Types of application and maximum percentages allowed (with and without the use of Leveling spacers)
Application types:
Maximum permissible mooring percentages according to application:
– Mismatched application without the use of leveling spacers (Wedge) the maximum lashing allowed is up to 15%;
– Mismatched application with the use of leveling spacers (Wedge) the maximum lashing is up to 50%;
Heads up:
– Roca Brasil Cerámica is not responsible for laying errors resulting from failure to follow the guidelines recommended by the manufacturer and/or required by standard.
– The wedge leveler spacer is mandatory for mismatched applications whose lashing is greater than 15%, if not used, the product will inevitably present unevenness from the retraction of the mortar and curvature of the pieces
– Settlement Base Verification
– The bedding base must comply with the ABNT-NBR13754 standard “Covering of internal walls with ceramic plates and using adhesive mortar”, below are some of the main recommendations:
– The baseplate must consist of one of these options: concrete cast in loco or precast, coated or not with roughcast and plaster; Masonry made of solid bricks or ceramic blocks coated with roughcast and plaster; Masonry of hollow concrete blocks, cellular concrete blocks or sand-lime bricks, coated or not with roughcast and plaster.
– When the base is coated with plaster, make sure that the plaster is well adhered to the base and does not present a hollow sound;
– The wall must be aligned in all directions, so that the same plane is obtained in its entirety;
– The surface that will receive the mortar must be clean, free from loose particles, oils, etc., which could compromise the adhesion of the adhesive mortar;
– The deviation from the flatness of the surface to be applied must not be greater than 3mm in relation to a straight ruler with 2m in length;
– It must have been executed at least 14 days in advance of plaster curing and at least 7 days for other surfaces, thus seeking to reduce the effect of mortar retraction on the ceramic coating to be executed.
– Movement and Decoupling Joints:
– The movement joint must be performed on walls with an area equal to or greater than 32m2, or when one of the sides is greater than 8 meters.
– In places exposed to moisture, the movement joint must be carried out on walls with an area equal to or greater than 24m2 or when one of the sides is greater than 6 meters.
– In the perimeter of the coated area, at the meeting of the area covered with floors and ceilings, columns, beams or with other types of coverings, and where there is a change in the materials that make up the wall, it is recommended to design and carry out desolidarization joints.
Step by Step for Laying Ceramic Tiles
– Start Settlement Only After Completing the Steps Below
– Water and sewage pipes duly built in and tested for tightness;
– Conduits, light board, junction box duly built in and tested;
– Fixing the frames and stops;
– Ceiling coatings;
– Verification of the Application Surface of Ceramic Coatings
– The baseplate must comply with the ABNT-NBR13754 standard “Covering of internal walls with ceramic plates and using adhesive mortar”, for further details, see preliminary tips and/or the standard itself;
– Check! The seating surface must be flat and aligned in all directions.;
– When the baseplate is coated with plaster, confirm its adherence before application, tapping with a piece of wood, if a hollow sound is identified, the plaster needs to be removed and redone;
– With the aid of a spatula, remove lumps of cement, mortar, plaster remains, paints, glue, among other materials adhered to the surface that may affect the adherence and leveling of the pieces;
– Then, with a brush or broom, sweep the surface to be applied, which must be clean and free from dust and/or loose particles (sand, mortar, plaster residues, spackle, etc.) that could compromise the mortar adhesion;
– Before laying, it is important to moisten the surface to be laid with the aid of a brush plus a bucket of water (without saturating). This operation prepares the surface for receiving the mortar and enhances the adhesion of the mortar to the substrate (base).
– Mortar
– According to preliminary tips, the mortar recommended for laying ceramic tiles is the ACI type.
– Preparation: Place the measure of water indicated on the package by the manufacturer in a bucket and under agitation of the mixer, add the powdered compound to the mortar until its end, keep stirring until obtaining a homogeneous mixture, without lumps, pasty and adherent. For the mortar additives to start their action, it is necessary to leave the mixture resting for a period indicated by the manufacturer (check the packaging, on average 15 minutes, depending on the manufacturer), then shake again and that’s it, the mortar is ready for use. Note: Never add more water than recommended by the manufacturer.
– Usage time: After preparation, use the mortar within 2 hours and 30 minutes, with the addition of water and other products being prohibited.
– Type of gluing (single or double layer of mortar), trowel and medium consumption.
Attention!
The way of laying, troweling and mortar consumption varies according to the size of the ceramic piece to be laid. According to NBR-ABNT 13754, pieces with an area equal to or greater than 900cm2 (30cmx30cm) must be applied with a double layer of mortar (mortar on the back of the piece and on the base to be laid). On the other hand, pieces with an area smaller than 900cm2 must be applied with a single layer of mortar (mortar only on the base to be laid). Below indicative table for trowel, procedure to be carried out and approximate average consumption based on the area of the piece to be applied:
Trowel and gluing table by format
| S surface area of ceramic plates (cm2) | S surface area of ceramic plates (cm2) | S surface area of ceramic plates (cm2) | S surface area of ceramic plates (cm2) |
|---|---|---|---|
| S < 400 | 6x6x6 squares | Simple glue | ± 4,0kg/m2 |
| 400 ≤ S < 900 | 8x8x8 squares | Simple glue | ± 4,5kg/m2 |
| S ≥ 900 | 8x8x8 squares | Simple glue | ± 7,5kg/m2 |
Planning:
– The first step is to identify the size of the piece to be applied, and then determine the trowel and the gluing process to be carried out (single gluing or double gluing).
– Later, review the arrangement of the pieces: Before starting the collage, it is recommended to review the layout, making sure that the layout of the pieces chosen is the one that best values the product and the environment, simulating and preventing unforeseen events, avoiding excessive clipping. , respect the movement and desolidarization joints, meet the desired aesthetic effect, etc.
– Double Gluing Process Execution: (pieces with an area greater than 900cm2)
– Identifying the Application Targeting Arrow:
– Remove the piece from the packaging and identify the orienting arrow on the back of the piece (back). This arrow serves to direct the laying, that is, all the pieces must be applied on the wall pointing in a single direction.
Note:
The problem is that with the application of mortar on the back, the arrow is covered, thus generating margins for application failures. To prevent this from happening, Incepa recommends using a pencil to scratch the side of the piece that contains the arrow (thickness). In this way, even after applying the mortar and covering the arrow, it is possible to identify the correct side for application through the lateral marking.
– Applying the mortar on the back of the piece and base to be laid (Wall):
– Before applying the mortar, make sure that the back (back of the piece) is free of dust or loose particles that could compromise the adhesion of the pieces, if necessary, clean the back with a plastic bristle brush before application.
– Rearward, with the smooth side of the steel trowel (see trowel to be used in the trowel table and gluing by format) spread the mortar on the back of the piece and on the base to be laid, pressing and dragging the trowel against the surface to be applied, thus forming a uniform mortar layer between 3mm to 4mm thick.
– Then, with the serrated side of the trowel (at a 60º angle in relation to the base to facilitate the operation), form grooves (cords) in the mortar applied on the back of the piece and on the base to be laid (wall). These cords will facilitate the leveling, alignment and fixation of the ceramic tiles.
– The excess of mortar removed with the trowel must be returned to the mortar container to be used in the next piece.
Note:
– To prevent excess mortar from migrating to the surface of the piece during placement and densification, with a trowel (at a 45º angle in relation to the base to facilitate the operation) remove the excess mortar applied to the sides of the piece, forming kind of a bevel.
– According to NBR 13754-1996, it is mandatory to use a double layer of mortar (mortar on the back of the piece and base to be laid) for laying formats larger than 900cm2 (30x30cm). Failure to comply compromises the adherence of the parts and automatically invalidates the warranty.
– Laying the Pieces:
– The laying of the pieces must be carried out from the bottom up, one piece at a time;
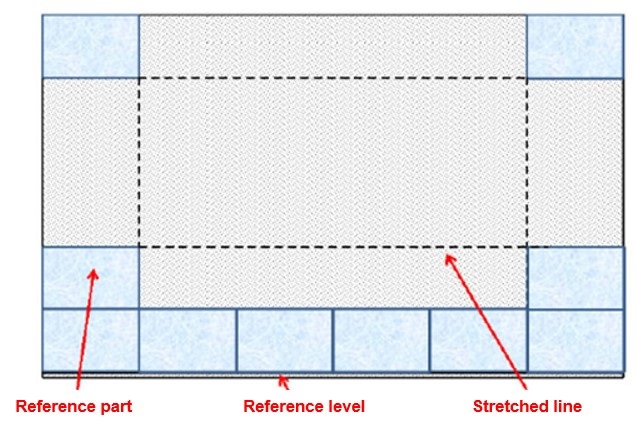
– At the ends of the base of the wall to be laid, install 2 pieces that will serve as guide pieces (one at each end of the wall), leveling them (taking as a base and reference floor level) and fitting them properly so as not to leave the position. Afterwards, stretch the line at the upper end of the applied pieces, thus facilitating the application and alignment of the other pieces of this first row.
– To ensure the plumb of the vertical rows, it is also recommended to apply guide pieces (leveled and upright) at the upper ends of the wall to be laid, and also to stretch the line between these pieces, referring to the ends of the pieces.
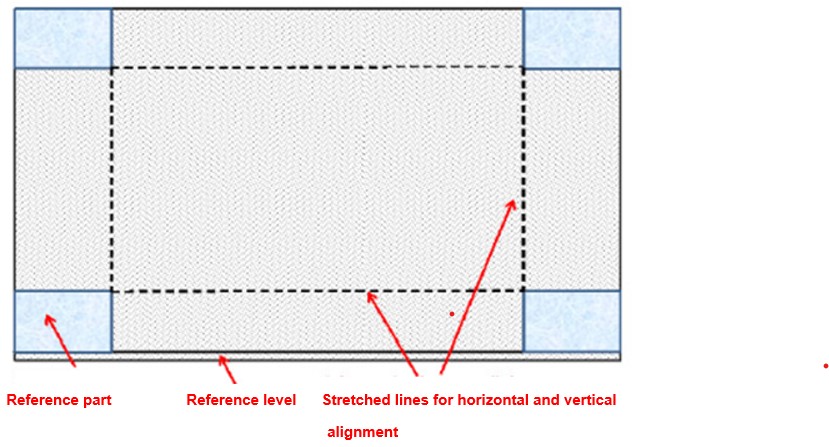
– Once the guide parts are installed and the reference lines stretched, the sequence in the laying of the other parts until the first row is closed, remembering that the minimum spacing recommended by the manufacturer must be respected. Note: To (use appropriate spacers).
– Important to emphasize that the pieces must be applied with a double layer of mortar and with the arrows directed in a single direction, thus guiding the application, thus ensuring better adherence, alignment, marriage of the pieces, etc.
– For application of the parts, it is recommended to place them slightly out of position (around 5cm) and with a rubber hammer (preferably white) perform small knocks and vibrations, so that the air draw and total crushing of the cords occur, in addition of adjustments in terms of level and plumb, as well as moving the pieces to the final position.
– Once the first row has been closed, repeat the installation operation of guide pieces at the ends, reference line, laying of the central pieces, etc., in the upper row and so on until the end of the wall where the installation takes place.
Comentarios:
– Es fundamental que las piezas guía se apliquen en la posición correcta, dentro del nivel, plomada, escuadra, etc. Para ello utilizar todos los recursos disponibles (línea, nivel de burbuja, nivel de manguera, nivel de ocio, regla de aluminio, etc.) asegurando así el correcto asentamiento de estas piezas, que serán referencias para la colocación del resto de piezas en fila y columna.
– Las piezas deben ser aplicadas de forma que garantice al menos el 70% de aplastamiento de los cordones, a comprobar, realizar una prueba de puesta en marcha al inicio y durante el tendido, y si no se ha alcanzado este porcentaje mínimo realizar ajustes ( intensificando golpes y vibraciones) hasta alcanzar este porcentaje. También es importante realizar una prueba de percusión dando golpecitos con el dedo, si se identifica un sonido hueco, se debe retirar la pieza y volver a colocarla (falta el mortero).
– Para el asentamiento de grandes formatos y revestimientos rectificados, Incepa recomienda aplicarlos con ayuda de espaciadores niveladores tipo cuña. Para mayor información consultar al Departamento de Asistencia Técnica de Incepa.
Importante:
No olvide realizar el movimiento y desolidarización de las articulaciones según lo recomendado por ABNT 13754: 1996 e informado en los Consejos Preliminares Importantes.
Cortés:
– Son necesarios para realizar paginación, cerramiento de ambientes, para contornear elementos estructurales como pilares y vigas, empotrar elementos de iluminación, desagües, tuberías, crear juntas de movimiento y dilatación, entre otros.
– Un corte perfecto solo es posible con la combinación de herramientas de calidad y en buen estado, operadas por mano de obra calificada.
– Los cortes rectos deben realizarse con el cortador de cerámica de sobremesa (videa).
– Con el cortador de cerámica de mesa, los principales consejos son:
– Raspa la pieza con un lápiz donde quieras cortar;
– Coloque la pieza en el cortador de cerámica y asegúrese de que esté bien apoyada y marcada debajo del video cortado;
– Pasar la enredadera de diamante sobre la marca con fuerza media (si se fuerza demasiado dará la apariencia de estrías, comprometiendo la calidad del corte).
– Una vez rayado el esmalte, colocar la pieza sobre el separador cortador de cerámica y utilizar la palanca con la fuerza hasta el desprendimiento y separación de las partes;
– Si es necesario, con una lija de hierro apoyada sobre un trozo de madera, lijar ligeramente la superficie rayada, dando el toque final al acabado. (Si el acabado está bien, elimine este paso).
– Los cortes irregulares para la inserción de cajas de paso, contornos de columnas o vigas, etc., deben realizarse con la cortadora manual (makita), los principales consejos se encuentran a continuación:
– Raspa la pieza donde quieras cortar;
– Taladrar con taladro en los vértices de los cortes, buscando aliviar tensiones;
– Realizar el corte con la cortadora manual;
– Resalte la parte que no se utilizará;
– Lijado con papel de lija de hierro apoyado sobre un trozo de madera para un mejor acabado;
– Circular cuts for insertion of pipes, lights, etc., must be carried out with the aid of a ceramic cup saw, the main tips are:
– Measure the size of the diameter of the pipe, light, drain or other element that you want to embed in the part;
– With the help of (drill + hole saw for ceramics in the correct diameter) make the desired cut;
Rejoining:
– Use flexible grout, in the preferred color, or another one as recommended by the manufacturer;
– Prepare as indicated and recommended by the grout manufacturer;
– Rejoin at least 3 days after laying;
– Clean the joints, leaving them free from any type of dirt that could impair the penetration and adhesion of the grout;
– Wet the joints with the aid of a brush (do not saturate), this will prepare the joints for better adhesion of the grout, it will also facilitate the hydration and the grouting process;
– With the joints still damp, apply the grout in excess with the aid of a spatula or rubber trowel, completely filling the joints.
Note:
To facilitate the application, perform diagonal movements in relation to the joints.
Note:
Carry out the procedure with medium strength and caution, seeking not to damage the product.
– Leave to dry for 15 minutes, then remove excess grout and clean the coating with the aid of a damp sponge, then dry with a clean cloth.
The correct cleaning of enameled floors, coverings or porcelain tiles must be carried out in 2 stages, the first being known as Post-Work Cleaning and the second Daily Cleaning.
– Post-Work Cleaning is responsible for removing work residues (mortar, cement, lime, plaster, paint, etc.) that may adhere to the product surface during the work and/or installation phase, leaving it looking dirty, grimy and lackluster. To facilitate and guarantee the total removal of these residues, post-work cleaning must be carried out with specific products.
– The Daily Cleaning, in turn, is responsible for cleaning and maintaining the products on a daily basis, removing the dirt generated on a daily basis (dust, grease, clay, food residues, splashes of juice, coffee, etc.). At this stage, common cleaning products such as neutral detergent, creamy soap, bleach, alcohol, white vinegar, etc. are used.
2. Post-Work Cleaning Procedure:
Required Material:
– Broom, collecting shovel, duster, squeegee, bucket, plastic spatula, cloth, “Quartzolit Ceramic Cleaner” (do not use on polished porcelain), neutral detergent, thinner or turpentine.
Important:
– Carry out post-work cleaning only after the grout has completely cured, that is, at least 72 hours after grouting or as directed by the grout manufacturer used.
– Carry out the post-construction cleaning very carefully, at this stage there are abrasive residues (sand, iron filings, debris, etc.) loose or adhered to the surface that can cause irreversible damage to the floor, porcelain or coating to be cleaned.
Step by step:
1 – With a broom, carefully sweep the floor or porcelain that you want to clean, removing the work residues that are loose on the applied product. Note: In case of wall cladding, “if necessary” remove the work residue (plaster dust, mortar, grout, etc.) with the aid of a duster.
2 – With a plastic spatula carefully remove residues of plaster, mortar, grout, cement, etc., which are adhered to the surface of the coverings, floors or porcelain tiles. Afterwards, carry out the sweeping and collection of these residues.
Note: Never use a metal spatula as it will damage the surface of the products.
3 – If you have splashes of oil paint, synthetic enamel, varnish or similar on the floors, coverings or porcelain tiles, remove them with the aid of a clean cloth plus the solvent used to dilute these products (thinner, turpentine, etc.) . If there is no paint splash or similar, skip this step.
Note:
It is important to perform a test on a part or piece of part not applied, seeking to assess whether the solvent to be used will not damage the surface of the product, if ok, proceed with cleaning;
Do not use solvents in accessories, banners and mosaics made of plastic, acrylic, etc., or that receive gloss paint, metallic paint or similar in its decoration. The use of these solvents will cause irreversible damage to the products. When in doubt, do not use and contact the Incepa Technical Assistance Department for more information.
4 – Then, pour plenty of water on the floor or porcelain, apply Cleaner for Ceramics – Quartzolit in the dilution recommended by the manufacturer (do not use on polished porcelain) and scrub with the aid of a broom.
Note:
In wall coverings, assess the need to use a Ceramic Cleaner – Quartzolit, since the coverings are smoother and brighter, with excess grout being easily removed with a solution of water, white vinegar and neutral detergent, applied with the aid of a brush and/or cloth + protective glove.
If there is a need to use ceramic cleaner – Quartzolit in wall coverings (satin coatings, relieved surfaces, more rustic, etc.) apply ceramic cleaner – Quartzolit diluted in water (in the proportion recommended by the manufacturer), with the assistance of a cloth and/or plastic bristle brush + protective glove.
5 – Leave the solution with the ceramic cleaner – Quartzolit to act for between 5 to 10 minutes (it will loosen and facilitate the removal of dirt) and with a broom and/or plastic bristle brush + protective glove scrub the floor, porcelain or wallcovering you want to clean.
6 – Afterwards, rinse the floors or porcelain tiles with plenty of water “until the cleaning solution and the residues adhered to and incorporated into it are completely removed”. In the coating, remove the solution with the aid of a cloth moistened with clean water + protective gloves, repeat the operation until complete removal of the solution is assured. Note: (never leave the solution together with the dirt to dry on the floor, porcelain or ceramic coating as it may damage the surface of these products).
7 – Next, wash with water and neutral detergent, scrubbing with the aid of a broom for floors or porcelain tiles, and with a damp cloth + protective glove for coatings. This step will ensure the removal of the cleaning solution and residues that may have remained from the previous step, as well as removing grease, oils, organic material residues and other dirt on the surface of the products.
8 – Rinse floors and porcelain tiles with water, removing excess water with a squeegee. Rinse the coverings with a damp cloth.
9 – To finish, dry with a clean cloth.
3. Daily Cleaning Procedure:
Required Material:
– Plastic bristle broom, plastic bristle brush, collecting shovel, cloth, bucket, neutral detergent, soap and squeegee.
Step by step:
1 – With the aid of a broom, sweep and collect the loose particles that are on the floor or porcelain.
2 – Later, with a hose or bucket, pour water on the surface of the floor or porcelain, moistening the surface to be cleaned.
3 – Next, pour neutral detergent on the moistened surface of the floor or porcelain and with the aid of a broom, scrub, distributing the detergent and generating foam on the product.
Note:
– For wall covering in a bucket, prepare a solution of water plus neutral detergent and with the aid of a cloth, Scoth Brite Teflon sponge (both sides) or common Scoth Brite sponge (yellow side only) rub and spread the solution over the surface of the coating.
4 – Allow the solution to act for around 5 to 10 minutes (The detergent will react by detaching the dirt and facilitating removal) and perform a new scrubbing, thus removing the dirt adhering to the coating, floor or porcelain.
Note:
If there are areas with impregnation of dirt and grime in the coverings, floors or porcelain, it is recommended to use creamy soap or Crystal “Pasta Rosa” paste applied by scrubbing with the use of a plastic bristle brush, Scoth Brite Teflon sponge (both sides) or common Scoth Brite sponge (yellow side only).
5 – Afterwards, rinse the floor or porcelain tiles with plenty of water, completely removing the soap and water solution plus dirt incorporated into it, remove excess water with a squeegee and dry with a clean cloth.
Note: – In coatings, remove the soap and water solution plus dirt incorporated into it with the aid of a cloth dampened in water, rinse, wring and repeat the operation until complete removal of the solution is assured, then dry with a clean, dry cloth.
4. Final considerations:
– Never use hydrofluoric acid and cleaning products that have high acidity or alkalinity components in their composition, such as stone cleaner, heavy cleaning detergent, undiluted acids, etc. These products, once used, will attack the enameled surface of the enameled products causing irreversible damage, ie DO NOT USE IN DOUBT.
– Certain substances that fall on the surface of the floor or applied porcelain may generate specific stains. To remove these stains, we recommend punctual cleaning with the products indicated in the table below:
| Stains generated by | Recommended Product For Removal |
|---|---|
| Waxes, fats, oils, greases, beer, wine, coca cola | Neutral detergent, CIF, Soap, VIM, Sodium hypochlorite, See Active Chlorine, Sodium Bicarbonate, whenever possible associated with water |
| Cement, Grout and Plaster | Quarzolit Ceramic Cleaner or consult the input manufacturer |
| Ink | Solvents (Thinner, Varsol, etc.) or acetone, benzene, alcohol, nitric acid (in the case of pens). |
| Rust | (Blank Water + Soap), Acetone, See Active Chlorine, Rust Out Gel Manufacturer Floor Clean. |
| Tire Brand | Turpentine and similar, soapy (powder or creamy) |
| Blood | Hydrogen peroxide |
| Iodine | Ammonia |
Note: Before cleaning using the products above, carefully read the recommendations described by the manufacturer on the packaging. Also, in case of doubt or further clarification, consult the Roca Brasil Cerâmica Technical Assistance Department.
It is a product applied on polished and polished enamel porcelain tiles already in the final stage of production, leaving the surface of these products with a matte and greasy appearance.
2. Purpose of Protective Wax:
– In the transport phase: Protects the surface of the parts inside the package against frictional risks, generated by the displacement and movement of the parts during the transport of the products. (It forms a kind of protective film that reduces friction between the parts inside the package);
– In the construction and application phases: It continues to protect the surface from scratches (it reduces the friction generated by construction residues such as sand, mortar, grout, etc.). It also protects against stains (the film formed on the surface reduces adhesion and facilitates the removal of paints, solvents, mortars, grouts, plasters, etc.) that, even with properly protected porcelain tiles (cardboard, plastic, etc.) accidentally splash onto the surface of the product.
3. Cleaning procedure:
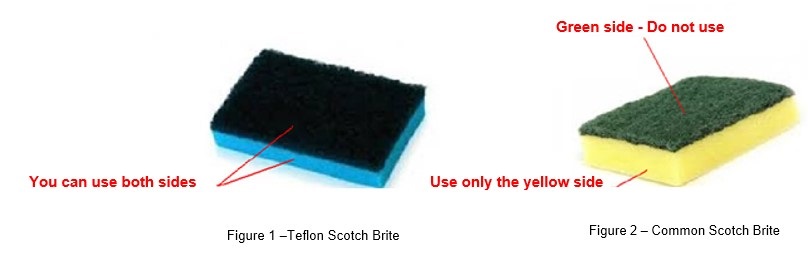
– Necessary Material: Scotch Brite Teflon sponge (recommended) or Common Scoth Brite sponge only the yellow side (green side damages the product surface), plus grout powder.
– Procedure: To remove the protective wax and restore the characteristic shine of polished porcelain and polished enamel tiles, Incepa recommends that the procedure below be performed dry (without adding water) and according to the following guidelines:
Spray a thin layer of grout powder (powder used to grout parts) with your hands;
With the aid of Scoth Brite Teflon sponge (either side) or common Scoth Brite sponge (yellow side only) perform circular movements with medium strength and speed, until the wax is completely removed and the shine is opened, repeat the operation on all parts of the area you want to clean. Note: The surface of the piece with the friction of the sponge will be slightly heated, facilitating the removal of the wax that will be incorporated (absorbed) by the grout powder.
After removing the protective wax (dry) from the entire area to be cleaned, it is recommended to wash it with water and neutral soap. (According to daily cleaning procedure).
4. Other precautions:
– Even with the presence of protective wax, it is recommended to avoid as much as possible the contact of the product with residues from works (sand, mortar remains, cement, plaster, paint, etc.) that could scratch the surface of the product or adhere to it. In view of this, it is advisable to keep the work clean of these residues and, if necessary, protect the floor with cardboard, canvas, etc.
– In case the residues above accidentally adhere and splash on the surface of the product, it is recommended to remove them carefully, using a plastic spatula with medium force.
– For paints based on volatile solvents (oil, synthetic enamel, etc.), before cleaning the applied product, make a test in 1 piece using thinner or turpentine and then wash with soap and water, evaluate the surface of the ask as a precaution (make sure you have not damaged the surface), having removed the stain and the surface unchanged, repeat the procedure on the parts of the environment you want to clean.
– Only remove the protective wax after carrying out all the work and completing the work, thus giving the product a greater guarantee of protection, maintaining the integrity of the product as well as avoiding future problems.
Instructions for daily cleaning of polished porcelain and polished enameled porcelain tiles follow:
1. Heads up:
For daily cleaning of polished porcelain and polished enamel tiles, cleaning products with a neutral pH (pH=7.0) should be used. Currently on the market there are cleaning products with high acidity and alkalinity that “promise to facilitate cleaning”, but they are highly aggressive, compromising and causing irreversible damage to the surface of porcelain tiles. (Example: Stone cleaner, undiluted acids, heavy cleaning detergent, etc.). Incepa recommends only the use of neutral detergent pH=7.0 (common dishwashing detergent), plus water.
2. Required Material:
Soft bristle broom, 2 buckets, squeegee, cloth, mild detergent and water.
3. Cleaning procedure (2 steps):
– Step 1: Initially, with a broom with soft bristles, sweep the area to be cleaned, removing and collecting all the dirt in the form of loose particles that is on the porcelain.
– Step 2: Later, it is necessary to wash the porcelain tile, and for this Incepa recommends the 2 buckets technique which consists of preparing a solution of water and neutral detergent in the first bucket “always to immerse the clean cloth” and in the second bucket provide clean water “always for soaking the dirty cloth”. How does it work?
– In the first bucket:
– Dip the clean cloth in the soap and water solution, remove and wring it lightly, later with the aid of a squeegee, use this cloth to distribute and rub the solution on some parts of the floor to be cleaned, let it act for around 2 to 3 minutes. During this period, the dirt floats (rises) and detaches, remaining within reach of the cloth and facilitating removal;
– In the second bucket:
– Wash the cloth used in the second bucket with clean water, leaving it ready for a new dip in the solution in bucket 1 and rubbing, in this way, in this way, the water and soap solution in bucket 1 will always be clean, not carrying dirt that marks the floor and make cleaning difficult. Important: Always replace the water in bucket 2 (do not let it get too dirty);
– Repeat the operation until the end of the area you want to clean;
– Dry with a clean, dry cloth.
Considerations:
– If you want to improve the drying of the product and give it a clean smell, you can add a small amount of perfumed alcohol to the dry cloth;
– To assist in cleaning larger areas, cleaning pads can be used (as shown in Figure 1).
Roca Brasil Ceràmica developed these technologies seeking to offer the market flooring and porcelain tiles that offer greater slippage safety, thus suitable for areas where slip resistance is required (wet areas, ramps, stairs in common use areas and terraces) in compliance with the Standards ABNT-NBR 13818:1997 Annex N and ABNT NBR 15575-3 “Performance Standard”.
Normally, these products, as they offer the security required by the standard (wet friction coefficient above 0.40), have their roughest or roughest surfaces, and their cleaning is divided into 2 stages. The first is called Post-Work Cleaning, indicated to remove work residues (grout, mortar, plaster, paint, etc.,) adhering to the surface of the product. The second is known as Daily Cleaning and its purpose is to clean the product from everyday dirt (dust, clay, grease, etc.), thus preventing it from adhering to the surface of the product, leaving it with a dirty/grimy appearance .
2. Post-Work Cleaning Procedure:
Required Material:
Broom, squeegee, plastic spatula, Quarzolit ceramic cleaner (do not use on polished porcelain), neutral detergent, thinner or white spirit.
Important:
Carry out post-work cleaning only after the grout has completely cured, (at least 72 hours after grouting) or as directed by the manufacturer.
Carry out the post-construction cleaning very carefully, at this stage there are loose or adhered abrasive residues on the surface that can cause irreversible damage to the floor or porcelain to be cleaned.
Step by step:
With a broom, carefully sweep the area to be cleaned, removing the work residues that are loose on the applied product;
With a plastic spatula “cautiously” remove any residues of plaster, mortar, grout, cement, etc., adhered to the surface of the product. Afterwards, carry out the sweeping and collection of these residues. Note: Never use a metal spatula as it will damage the surface of the floor or porcelain.
If you have splashes of oil paint, synthetic enamel, varnish or similar, remove it with the aid of a Scoth Brite cloth or sponge (either side) plus the solvent used to dilute the paint, such as thinner, turpentine, etc. Note: If you don’t have paint splatters or similar, skip this step.
Pour plenty of water on the floor and then apply the ceramic cleaner – Quartzolit in the dilution recommended by the manufacturer, scrub with the aid of a brush or broom to spread the solution.
Allow the product to act for 5 to 10 minutes (for the solution to act and facilitate removal) and with the broom, rub the area to be cleaned again.
Afterwards, rinse with water “until the cleaning solution and residues adhered to and incorporated into it are completely removed”. Note: (never leave the solution together with the dirt to dry on the floor or porcelain as it may damage the surface of the product).
Afterwards, wash with water and neutral detergent. (Apply a solution of water and neutral detergent on the floor, spread with a broom, let it act for 5 to 10 minutes, then scrub with a broom). Note: This step will ensure the removal of the cleaning solution and residues that may have remained from the previous step, as well as removing grease, oils, organic material residues and other dirt present on the product surface.
To finish, rinse with plenty of water, remove excess water with a squeegee and dry with a clean cloth or wait for it to dry naturally.
3. Daily Cleaning Procedure:
Required Material:
Plastic bristle broom, plastic bristle brush, neutral detergent, soap or pink paste (Crystal paste) and squeegee.
Step by step:
With the help of a broom, sweep and collect the loose particles that are on the product;
Later, with a hose or bucket, pour water on the surface of the product, moistening the surface to be cleaned;
Then, pour neutral detergent on the moistened surface and scrub to distribute the detergent and generate foam on the product;
Let it act for 5 to 10 minutes (The detergent will react, loosening the dirt and facilitating removal);
Scrub it with a plastic bristle broom to remove dirt and clean the product;
If there are areas with greater impregnation of dirt and grime, it is recommended to use a creamy soap or pink paste (Crystal Paste), applied by rubbing with the aid of a Scoth Brite sponge or a plastic bristle brush. Note: If you do not delete this step
Afterwards, rinse the product with plenty of water, completely removing the soap and water solution and the dirt incorporated into it.
Remove excess water with a squeegee and dry the surface with a clean cloth, or let it dry naturally.
Comments:
For places with higher traffic, or exposed to a higher level of dirt, the post-work cleaning procedure can be repeated once or twice a year.
Final considerations:
Never use hydrofluoric acid and cleaning products that have high acidity or alkalinity components in their composition, such as stone cleaner, heavy cleaning detergent, undiluted acids, etc. Once these products are used, they will attack the enameled surface of the product causing irreversible damage, ie DO NOT USE IN DOUBT and consult the Incepa Technical Assistance Department.
Certain substances that fall on the surface of the floor or applied porcelain may generate specific stains. To remove these stains, punctual cleaning can be carried out with the products indicated in the table below:
| Stains generated by | Recommended Product For Removal |
|---|---|
| Waxes, fats, oils, greases, beer, wine, coca cola | Neutral detergent, CIF, Soap, VIM, Sodium hypochlorite, See Active Chlorine, Sodium Bicarbonate, whenever possible associated with water |
| Cement, Grout and Plaster | Quarzolit Ceramic Cleaner or consult the input manufacturer |
| Ink | Solvents (Thinner, Varsol, etc.) or acetone, benzene, alcohol, nitric acid (in the case of pens). |
| Rust | (Blank Water + Soap), Acetone, See Active Chlorine, Rust Out Gel Manufacturer Floor Clean. |
| Tire Brand | Turpentine and similar, soapy (powder or creamy) |
| Blood | Hydrogen peroxide |
| Iodine | Ammonia |
Note: Before cleaning using the products above, carefully read the recommendations described by the manufacturer on the packaging. Also, in case of doubt or further clarification, consult the Roca Brasil Cerâmica Technical Assistance Department.